How I Made Those Planets
After I published this game I got a bunch of questions about how I generated the planets in Bitsy, so I wanted to write up a devlog in case it's helpful for folks. Then I... forgot to do that, for almost a month. Oops. Anyway, here this is now.
Before we get into it:
- I'm going to assume you already know about variables in Bitsy. If you don't, here's an excellent intro by ayolland.
- This uses Borksy and a whole bunch of hacks from the hack repo. I'm not going to get too deep into how to use these things, because they're both pretty well explained, but please feel free to ask me if you get confused!
- My method involves writing a tiny bit of Javascript. It doesn't actually need it, but without it, my dialog got extremely messy and just thinking about debugging it was giving me a headache. If you don't know coding, you can skip that part; after it I'll talk about how I could have done it entirely in Bitsy.
Okay that's it let's goooooo
Planning
If you haven't played it (or haven't played it recently), Mellifluent is a game in which a space bee gathers honey from some stars, and accidentally creates a bunch of planets. Visiting two stars plants a seed; after some time passes, the seed grows into a planet. I wanted the planets to have different appearances depending on the stars that were used to create them, both in the art and in a text description. The bee and the planets can talk to each other, and I also wanted that text to change based on the parent stars.
The game has 13 stars, 12 of which determine the properties of the planet that will be created, and one that triggers the planet to appear. So visiting any two non-trigger stars creates a planet seed; once a planet seed is on the screen, visiting the trigger star will cause time to pass, letting the seed grow into a planet.
I decided each planet would get the following:
- Two adjectives describing it, which would come up in dialog, one from each star
- Four tiles, two from each star, and
- One set of dialog, from one of the stars. (I originally tried to have one line of dialog from each star, but I found I was just writing more boring dialog so they could fit with any other line... and writing unique dialog for all star combinations was a little outside the scope of this project.)
I also decided that the order the stars were visited would matter, to produce a little more variation, so visiting star 1 and then star 2 would get a different result than visiting star 2 and then star 1.
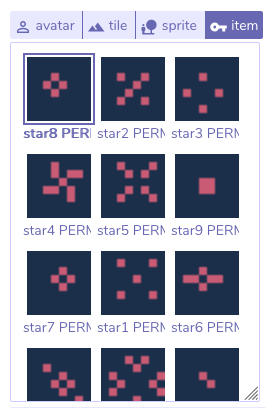
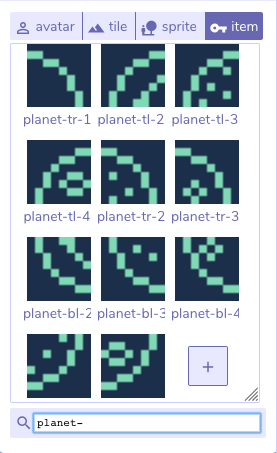
So I drew a bunch of planet tiles, and numbered them...
And I made a big list, for each star, of two adjectives, two sets of tiles, and one set of dialog. For example, for star 1, I had: marine (3,1), lightning-lit (1, 2), "I remember you. / Do you, little (adjective 1) and (adjective 2) planet? / When I was pollen, you carried me across the black." So if star 1 was visited first, it would have the adjective marine, the third top left tile and the first top right tile; if it was visited second, it would have the adjective lightning-lit, the first bottom-left tile, and the second bottom-right tile. The dialog line would be used if it was the second star visited.
Putting It Together In Bitsy
Each room starts out containing two or more stars (which are items that can't be picked up, thanks to the permanent items hack, because I wanted to reuse them in other rooms), the trigger star, and four blank permanent items, where the planet will be. Let's start with the star dialog.
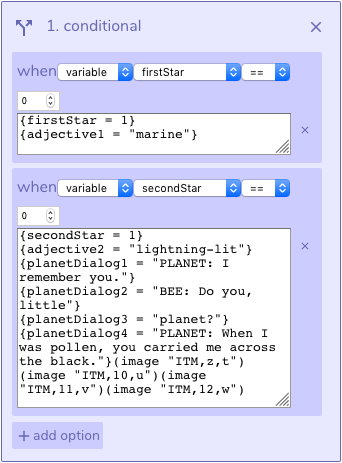
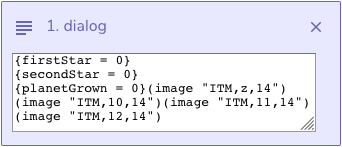
This is the dialog for star 1, minus some parts that aren't relevant to planet generation. The variables firstStar and secondStar are both set to 0 at the beginning of the game, and then are used to keep track of which stars have been visited. So, the first part of the conditional checks to see if firstStar has been set; if it hasn't, I set it to 1 (since we're at the first star) and store star 1's first adjective for use later.
If firstStar has been set, we move to the second part of the conditional and check to see if secondStar has been set. If it hasn't, I set it to the star's ID, and then store the second adjective and all of the dialog for the planet that will be generated. It has to be in four parts to display correctly; we'll talk about that a bit more when we get to the dialog for the planet. Since this is the second star visited, it's time to produce a planet seed. That's what the stuff that looks like (image "ITM,z,t") is doing, using the hack edit image from dialog. It's replacing the four blank planet items that start out in the room with four items that have the planet seed drawn in them.
If both firstStar and secondStar have been set, we don't do anything, since this game only makes one planet at a time.
All of the other stars have the same dialog with the ID number, adjectives, and dialog changed. So let's move on to the dialog for the trigger star.
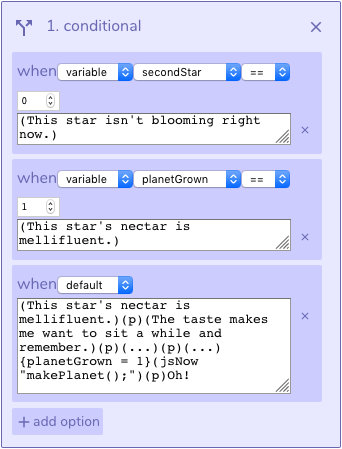
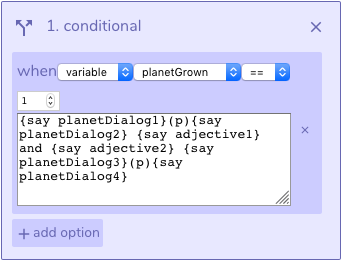
The trigger star should only make a new planet if there's already a planet seed, but no grown planet. That's what the first two parts of this conditional is accomplishing: if secondStar is still 0, we haven't visited two stars yet, so there's no planet seed ready. planetGrown is a variable that starts the game at 0 and gets set to 1 in the next part of the condition, once our planet is done. So if it's already 1 when the dialog starts, there's already a planet, and we don't need to make a new one.
If neither of those conditions are true, then it's time to make a new planet. This is where my javascript comes in. The statement (jsNow "makePlanet();") uses the javascript from dialog hack to call a function I wrote which selects the correct planet items and displays them. I'll talk about that more in a bit.
(I'm also using the paragraph break hack in this dialog to force dialog to display on a new screen. That's what the (p) is.)
Okay, onto the planet!
The conditional makes sure the planet only speaks after it, you know, exists. We don't want the blank placeholder items speaking. All of the dialog has the same form:
Planet: (some dialog)
Bee: (some dialog, which includes the two adjectives that describe the planet)
Planet: (some more dialog)
So this is just displaying the variables we set earlier in those three chunks, with paragraph breaks in between them. Pretty simple.
One last piece of dialog we need to look at, and then we're done. When you move to a new room, I needed to reset some variables which I reuse, and replace the planet items with a blank item, using edit image from dialog again. So I have invisible items on top of all the exits with this dialog:
And that's it! It's Javascript time now.
It's Javascript Time Now
It's Javascript time now.
First I added this line to the end of the edit image from dialog hack, so I could use the editImage function directly from the makePlanet function.
window.editImage = editImage;
I made a couple two-dimensional arrays to keep a list of which planet items would be used for each star. The first array contains names of items for the top left and top right of the planet, which depend on the first star visited. So, if star 1 is visited first, it'll use planet-tl-3 and planet-tr-1, and so on.
var firstPlanetTiles = [
     ["planet-tl-3","planet-tr-1"],
     ["planet-tl-1","planet-tr-2"],
     ["planet-tl-1","planet-tr-3"],
     ["planet-tl-3","planet-tr-2"],
     ["planet-tl-2","planet-tr-2"],
     ["planet-tl-2","planet-tr-1"],
     ["planet-tl-1","planet-tr-1"],
     ["planet-tl-2","planet-tr-3"],
     ["planet-tl-3","planet-tr-3"],
     ["planet-tl-4","planet-tr-1"],
     ["planet-tl-4","planet-tr-3"],
     ["planet-tl-4","planet-tr-2"],
];
The second array contains the bottom left and bottom right of the planet, which depend on the second star visited.
var secondPlanetTiles = [
     ["planet-bl-1","planet-br-2"],
     ["planet-bl-1","planet-br-3"],
     ["planet-bl-2","planet-br-1"],
     ["planet-bl-2","planet-br-2"],
     ["planet-bl-3","planet-br-1"],
     ["planet-bl-4","planet-br-1"],
     ["planet-bl-2","planet-br-3"],
     ["planet-bl-3","planet-br-3"],
     ["planet-bl-4","planet-br-2"],
     ["planet-bl-3","planet-br-2"],
     ["planet-bl-4","planet-br-3"],
     ["planet-bl-1","planet-br-1"],
];
The makePlanet function just gets the bitsy variables firstPlanet and secondPlanet, (subtracting 1, since my star IDs start at 1 instead of 0) retrieves the correct item names from the array, puts them into a string (in the same format as you'd use if you were using the edit image from dialog hack normally) them to and sends them to the editImage function.
function makePlanet(){
    var firstIndex = window.bitsyVariableMap.get("firstStar")-1;
    var secondIndex = window.bitsyVariableMap.get("secondStar")-1;
    var top = firstPlanetTiles[firstIndex];
    var bottom = secondPlanetTiles[secondIndex];
    window.editImage(null,["ITM,z,"+top[0]]);
    window.editImage(null,["ITM,10,"+top[1]]);
    window.editImage(null,["ITM,11,"+bottom[0]]);
    window.editImage(null,["ITM,12,"+bottom[1]]);
}
If you use Borksy to do your hacking, it makes the variable map globally available by default; if you are not using Borksy, I think there's a hack available in the hack repo that does the same thing? It is a map with the variable names as key values, so you need to use .get() to retrieve things and .set() to modify them.
The one other thing to notice here is that editImage expects its parameters to be inside of an array, so: stick the string in an array.
And that's it! That's all of it.
What If I Don't Want To Write Javascript, Though
Well, firstly, you're valid, and I support you. Secondly, you can do the same stuff if you just take out (jsNow "makePlanet();") and add in two really long conditionals that use the edit image from dialog hack. The first one will go through every possibility for firstStar and put the right items in the top left and right spots, and the second will go through every possibility for secondStar and put the right items in the bottom left and right spots. I'm not going to make the whole thing, but here's how I would've done it for the first two stars, so you can get the general idea:


And there you go: planets. Again, feel free to ask me questions if anything's confusing. I hope this helps you in your future bitsy endeavors!
Leave a comment
Log in with itch.io to leave a comment.